Your cart is currently empty!

How does a laser cutter work step by step?
Laser cutting technology has revolutionized manufacturing and craftsmanship by offering precise, efficient, and versatile cutting capabilities across various materials. Understanding how a laser cutter works step by step provides insights into its intricate process and the potential applications in industries ranging from automotive to arts and crafts.
Step 1: Laser Generation
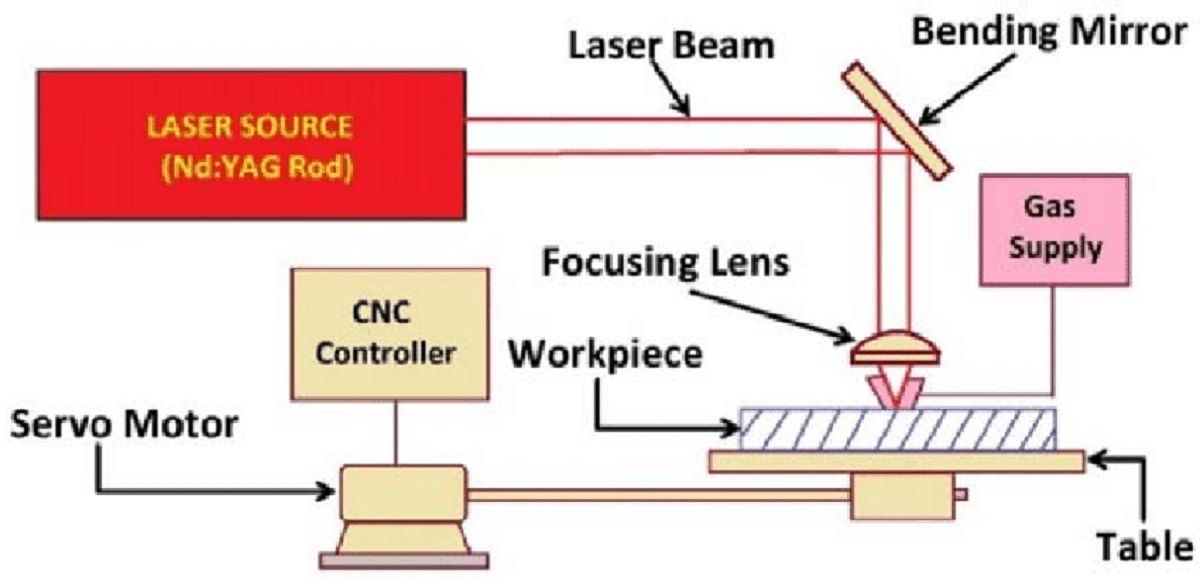
- Laser Source: The process begins with a high-powered laser beam generated within a laser resonator. This resonator contains a gas mixture (typically CO2, Nd, or fiber) that, when excited electrically, produces a concentrated beam of light at a specific wavelength.
Step 2: Beam Amplification
- Beam Amplification: The laser beam passes through a series of mirrors and lenses within the laser cutter machine. These components amplify and focus the beam to achieve a precise and intense cutting or engraving capability.
Step 3: Material Preparation
- Material Setup: The material to be cut or engraved is placed onto the bed of the laser cutter. Depending on the machine, this bed may be fixed or adjustable to accommodate various material sizes and thicknesses.
Step 4: CNC Control
- Computer Numerical Control (CNC): An essential part of laser cutting is the CNC system, which uses computer software to guide the laser cutter’s movements. The design or pattern to be cut or engraved is uploaded to the CNC software, which converts it into a set of instructions for the laser cutter.
Step 5: Beam Application
- Laser Cutting/Engraving: With the material positioned correctly and the CNC program loaded, the laser cutter begins its operation. The focused laser beam precisely follows the programmed path, melting, vaporizing, or burning away material along the cutting line. For engraving, the laser removes layers of material to create detailed designs or markings.
Step 6: Cooling and Fume Extraction
- Cooling and Fume Management: During operation, the laser generates heat that can affect both the material and the laser components. Cooling systems, such as air or water cooling, are employed to maintain optimal operating temperatures and ensure consistent performance. Fume extraction systems remove gases and particles produced during cutting or engraving to maintain a safe working environment.
Step 7: Quality Control and Finishing
- Quality Assurance: Throughout the process, quality control measures ensure that the final product meets specifications regarding dimensions, accuracy, and surface finish. Operators may inspect the output periodically to make adjustments as needed.
Step 8: Post-Processing
- Post-Processing: Once the cutting or engraving is complete, the finished pieces may undergo additional treatments or finishing processes. This could include cleaning off residue, polishing edges, or assembling components into a final product.
Applications of Laser Cutting Technology
- Industrial Manufacturing: Used for precise cutting of metal sheets, pipes, and structural components in industries such as aerospace and automotive.
- Art and Design: Enables artists and designers to create intricate patterns, sculptures, and prototypes with a high degree of detail.
- Commercial Applications: Supports custom signage, promotional products, and packaging solutions by offering precise engraving and cutting capabilities.
Conclusion
Understanding the step-by-step process of how a laser cutter works highlights its efficiency, precision, and diverse applications across various industries. From small-scale crafting to large-scale manufacturing, laser cutting technology continues to drive innovation and creativity. Whether you’re exploring new business opportunities or simply fascinated by technology, the capabilities of laser cutters offer endless possibilities for creating intricate designs and functional components.
Explore how laser cutting technology can enhance your projects or business ventures and share your experiences in the comments below!


